The Class Couple
  • HOME
  • About Us
  • Blog
  • Read
  • Our Home
  • Shop

The Power of Children's Literature to Create Caring Classrooms

1/8/2017

0 Comments

 
One of my favorite parts of the school day is when I read aloud with my kids. It is one of the purest moments you and your students can share.  Not only can books take you to fantastical places, I truly value their ability to put you in the shoes of others, transform your thoughts, and change your viewpoints. It is for this reason that I love using children's literature to teach empathy and respect for others to promote classroom community.
Picture
Picture
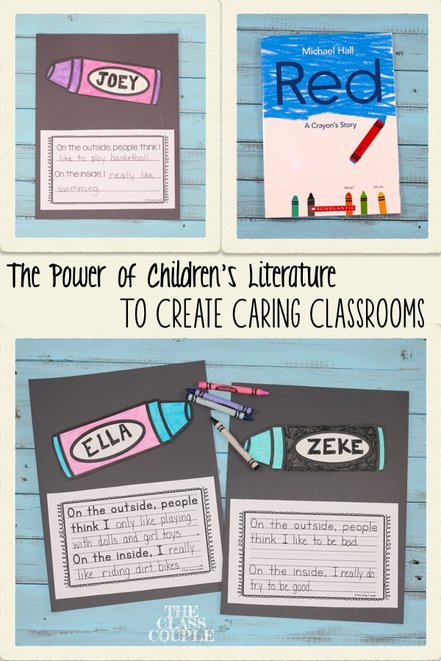
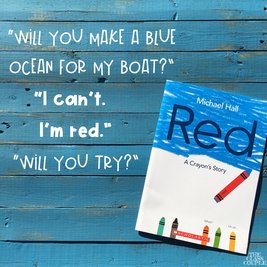
One of my new favorite books is Red by Michael Hall. It is about a crayon who is labeled red, but he actually colors blue. Instead of accepting that he is blue, everyone is stuck on the label and tries to provide many interventions to try and get him to be red. It isn’t until a new crayon friend sees him for who he truly is and asks him to draw a blue ocean. Others realize they have been judging him all wrong and finally recognize that he is blue. 

This book could truly be read to students of all ages. I have had a few different people read this story, and each person has made different connections and felt it to not only be powerful for themselves, but also for a wide range of audiences. This book is the perfect story to open up a dialogue about judging others solely on their outward appearance. It shows us the importance of seeing and accepting a person for who they truly are, seeing their inner beauty. Once we feel accepted, we feel like we belong, we have a place, we fit in. 
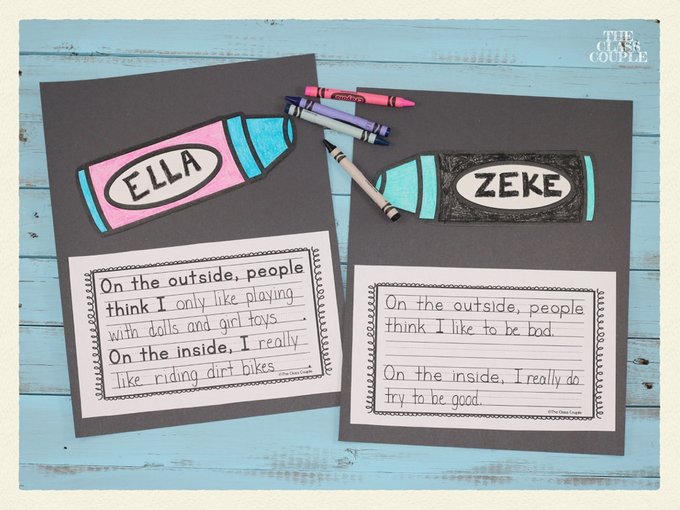
I knew I wanted to share Red with my students, but I also wanted them to make a more personal connection with the book; to share a part of themselves with the class, that others may not know. I came up with a simple idea of having them share a quality that they believe people see about them from the outside, and then share a more personal quality that their peers would not know until they really got to know them. Students can also color their crayon to represent their outside and inside qualities. My hope is for students to embrace each other's hidden qualities, likes, and differences. Teachers of older students could also ask their class to keep their crayon anonymous to ensure privacy. Students may be more willing to share personal thoughts if they know there is more of an "unknown factor."
Picture
This activity is a forever FREEBIE in our Teachers Pay Teachers store. You can find it HERE! The book Red is currently being sold by Scholastic Reading Club, and can also be found on Amazon. This is a book you really do need in your life! If you would like to see more of my favorite read alouds, be sure to follow my Instagram account, @theclasscouple, where I share all of my favorite read alouds.
Picture
Picture
Additionally, if you are looking for more ideas to promote classroom community with kindness, empathy, and acceptance be sure to search the hashtags #kindnessnation and #weholdthesetruths on Teachers Pay Teachers. Many fabulous sellers have linked together to share thoughtful resources with the hope of a future filled with kind and understanding young learners, citizens, and individuals.
I hope you find these resources to be of great value for your classroom! After all, acceptance, empathy, and caring are qualities all teachers and parents wish for their children to bestow upon others and have others bestow onto them.
Picture
An InLinkz Link-up
0 Comments

Halloween Gift Tags for Candy Free Options

10/10/2016

0 Comments

 
Does your school have a no food or no candy policy? My elementary school does. As a mom of a little boy who seems to get cavities after every piece of candy he eats (despite relentless toothbrushing and flossing), I can appreciate this rule. However, it can sometimes make it tricky for us teachers when we want to provide a holiday treat for our students. So, it was time to get creative!
Does your school have a no food or candy policy? These Halloween Gift Tags are a fun and creative way to treat your students!
One of my favorite student gifts for Halloween is the witch fingers. I like to have my students keep them in their toolbox to use when reading. Not only do we use them for tracking when reading, but we also use them when we are pointing to labels, captions, and other non-fiction text features, as well as when we point to illustrations and text to cite evidence when responding to questions. As silly as they are, they give the students magical powers that help them direct their eyes to the text! I found these witch pointer fingers in the Halloween section at Target. (24 witch fingers for $3)
Does your school have a no food or candy policy? These Halloween Gift Tags are a fun and creative way to treat your students!
We all love the mini erasers you can find in Target's Dollar Spot. But let's be honest, I like to keep them for the classroom because they are the perfect size for manipulatives! So, when I found these pumpkin erasers that are about twice the size of the dollar spot erasers, I knew these would be just the thing to gift to my kiddos! These were also found in Target's Halloween section. (60 erasers for $3.)
Does your school have a no food or candy policy? These Halloween Gift Tags are a fun and creative way to treat your students!
If you happen to pick up these festive items on one of your many trips to Target, be sure to grab my Halloween Gift Tag Freebie to go along with them! If you teach in a district/school where you do not celebrate Halloween, I did include a "Happy Fall" option to go along with the pumpkin erasers. Your kiddos will love how fun they are, you will love that they can be used in the classroom, and your parents will thank you for not sending home another piece of sugar. (They will get plenty on Halloween night!) 

Enjoy, and Happy Halloween!
Picture
Follow
0 Comments

How to Make a Delightful Fabric Garland Banner

7/24/2016

5 Comments

 
 The reading area is by far my most favorite spot in my classroom. When I wanted to dress it up and make it even more inviting, I decided that a fabric garland would give it the perfect touch! I soon became addicted to making these banners, and noticed that everyone I shared them with loved them too. So, after receiving many questions about how I made them, I decided to make a tutorial and share the love of garland banners with everyone. Oh, and by the way, fabric garlands aren't just for the classroom, so read on! 
Learn how to make delightful fabric garland banners/curtains for your classroom, home, party, etc. This post provides step by step directions to help you make the perfect banner.
Step 1: Find your Fabric & Materials
The width of your windows will determine how much fabric you will need. The width of my windows was 12 feet, so I knew it would be a large garland. Because of this, I thought 6 different fabrics would be the perfect amount to add variation in the curtain. I also did not get the same amount for each fabric, due to what they had left of the fabrics. I got 2 yards for 4 of the patterns, and 1.5 yards for 2 of the patterns. This was JUST enough with no fabric strips left to spare, so I would say a good rule of thumb would be to get one yard of fabric per foot. My fabrics were from JoAnn Fabrics. (Don't forget that teachers get a discount!) You will also need to find some heavy twine/jute. You can take a look at what I used. The best deal I found for the jute was at A.C. Moore with a 50% off coupon.
Picture
Picture
Step 2: Prep Your Fabric
Cut off the white edge of the fabric. Then, cut small slits in your fabric. They can be spaced apart in whatever width you would like your strips to be. Mine ranged from 1 to 2 inches apart. 
*Note: Because my windows are tall, I did not need to cut my fabric to make it shorter. However, if you have shorter windows, you may need to cut your fabric to a smaller width before cutting the small slits.
Picture
Picture
Step 3: Tear Away!
Grab ahold of the strip you cut, and pull it down the width of the fabric. The strips won't be exactly the same width, and they will fray, but that's the beauty of the fabric garland: perfectly imperfect! 
Warning: This step will result in high amounts of fringes! Just make a pile and see how big it can get! 
Picture
Picture
Don't forget to admire the prettiness of all the colors!
Step 4: Measure Jute
Now you will have to decide how you want your curtain/garland to hang. I wanted mine to sway down and come up in the middle, so I knew I would need to make it a little longer than 12 feet wide. I decided to cut my jute 20 feet long, keeping in mind that I wanted to have plenty of space at the ends for knots to hang the curtain. (Always measure longer than you think you will need, so you don't run out of twine.) Once I had my 20 feet measured, I folded the jute in half and marked the 10 foot point with painter's tape. This was my middle starting point. I started tying knots in the middle and worked my way out to the ends. This helped me keep the curtain even. I also placed tape marks around the 3 feet mark. I stopped close to these points so I had enough room to tie the knots at the end. I also wasn't exactly sure how it would hang until I got to my classroom, so I wanted to allow for some wiggle room with the length of jute.
Picture
Tape the middle for a starting point.
Picture
Tape the ends to allow room for the knots.
Step 5: Tie ALL the Fabric Strips!
This is definitely the most time consuming part, but don't give up now! It will be worth it in the end...trust me! I suggest finding a series to binge watch on Netflix, enjoying a nice drink, and enlisting the help of your supportive significant other or best friend. Since it is easier to show this step, rather than explain it in writing, check out this super short video I made on how to tie the knots. The only thing you need to be sure of is that you do them all the same way. So if you start with your fabric over or underneath the jute, do that with all of them. 
When you are tying the fabric strips, remember that they do not have to be in any particular pattern. I just tried to make sure I had a good mix of dark and light colors throughout the curtain. Since I had gotten more of two of the fabric patterns, I mixed these into the rotation more often than some of the other accent patterns.
Step 6: CELEBRATE!!
Picture
Woohoo! You did it! Stand up and stretch, give yourself a pat on the back, and thank your helper! Take a look at the lovely fabric garland you just created!

Step 7: Hang and Enjoy!
I tied big loop knots at the ends of the garland. I also used ceiling hooks and placed them on each end of the window, and slipped the loops on the hooks. For the middle, I also placed a ceiling hook at that spot, and put a binder clip through the middle point of my curtain. The binder clip then hangs on the hook. Here is a quick video on how I made the end loops.
That's all there is to it! Such a simple project, but it made a world of difference in brightening up my classroom!
Picture
Oh, and don't think that these garlands are just for the classroom! The possibilities are endless! They are perfect for nurseries, kids rooms, holidays, parties, etc. We made a Christmas garland for our kitchen, and also used it in our family pictures for our Christmas cards.  (Could that picture be any cuter?!)
Picture
Picture
If you decide to make one of these adorable fabric garlands for your classroom or home, be sure to tag me on Instagram! I would love to see it it!
Picture
Check out my classroom projects! 
http://www.donorschoose.org/Becky.Wimmer
Follow
5 Comments
<<Previous
Forward>>
    Picture
    Picture

    Mr. & Mrs.

    We are Becky and Greg from York, PA. Becky just started her 13th year of teaching first grade. Greg is a high school social studies teacher. We love teaching and this blog is a peek into our world. 

    Picture
    Picture
    Picture
    Picture
    Picture
    Picture
    Picture
    GoNoodle Inspiration Blog
    Picture

    the library

    June 2019
    March 2019
    August 2018
    February 2018
    September 2017
    August 2017
    January 2017
    October 2016
    July 2016
    May 2016
    April 2016
    February 2016
    January 2016
    November 2015
    October 2015
    September 2015
    August 2015
    July 2015
    June 2015
    May 2015
    April 2015
    March 2015
    February 2015
    January 2015
    December 2014
    November 2014
    October 2014
    September 2014
    August 2014
    July 2014

    Picture

    tag, you're it!

    All
    Adding
    Alphabet
    Apush
    Assessments
    Authentic
    Becky
    Becky & Greg
    Cause & Effect
    Children's Literature
    Classroom
    Classroom Community
    Classroom Management
    Classroom Tour
    Columbus
    Craftivity
    Criticalthinking
    Currently
    Doubles Facts
    Fact Families
    Fire Safety
    Five For Friday
    George Washington
    GoNoodle
    Graphing
    Greater Than And Less Than
    Greg
    Halloween
    Highfrequencywords
    How To
    Instagram
    Journeys
    Makingconnections
    Math
    Movie Making
    Numbers
    Perspective
    Phonics
    Primary Sources
    Project Based Learning
    Pumpkins
    Purpose
    QR Codes
    Raise Responsibility
    Reading
    Scholastic Book Orders
    Spelling
    Summer
    Summer Prep
    Teachers Pay Teachers
    Technology
    Time
    Twitter
    Videos
    Writing

    Picture

    subscribe

    Enter your email address:

    Delivered by FeedBurner


    Blog Design by Alexis Sanchez ©
Powered by Create your own unique website with customizable templates.