The Class Couple
  • HOME
  • About Us
  • Blog
  • Read
  • Our Home
  • Shop

Halloween Gift Tags for Candy Free Options

10/10/2016

0 Comments

 
Does your school have a no food or no candy policy? My elementary school does. As a mom of a little boy who seems to get cavities after every piece of candy he eats (despite relentless toothbrushing and flossing), I can appreciate this rule. However, it can sometimes make it tricky for us teachers when we want to provide a holiday treat for our students. So, it was time to get creative!
Does your school have a no food or candy policy? These Halloween Gift Tags are a fun and creative way to treat your students!
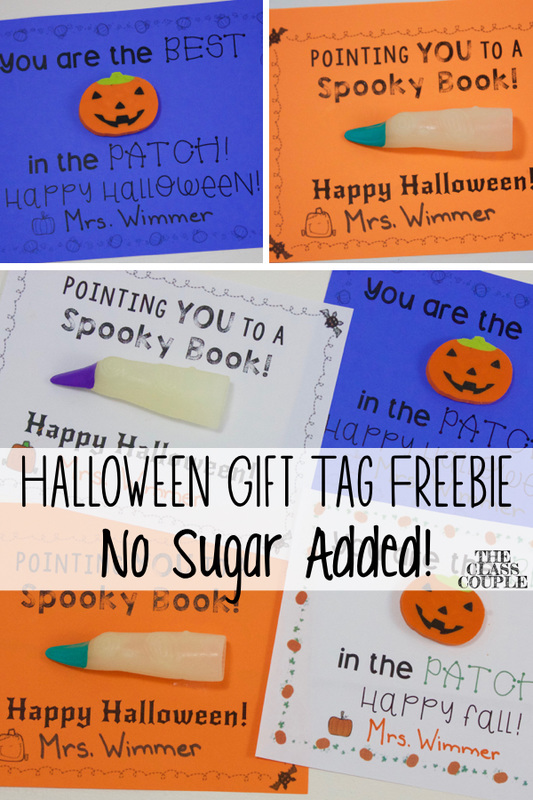
One of my favorite student gifts for Halloween is the witch fingers. I like to have my students keep them in their toolbox to use when reading. Not only do we use them for tracking when reading, but we also use them when we are pointing to labels, captions, and other non-fiction text features, as well as when we point to illustrations and text to cite evidence when responding to questions. As silly as they are, they give the students magical powers that help them direct their eyes to the text! I found these witch pointer fingers in the Halloween section at Target. (24 witch fingers for $3)
Does your school have a no food or candy policy? These Halloween Gift Tags are a fun and creative way to treat your students!
We all love the mini erasers you can find in Target's Dollar Spot. But let's be honest, I like to keep them for the classroom because they are the perfect size for manipulatives! So, when I found these pumpkin erasers that are about twice the size of the dollar spot erasers, I knew these would be just the thing to gift to my kiddos! These were also found in Target's Halloween section. (60 erasers for $3.)
Does your school have a no food or candy policy? These Halloween Gift Tags are a fun and creative way to treat your students!
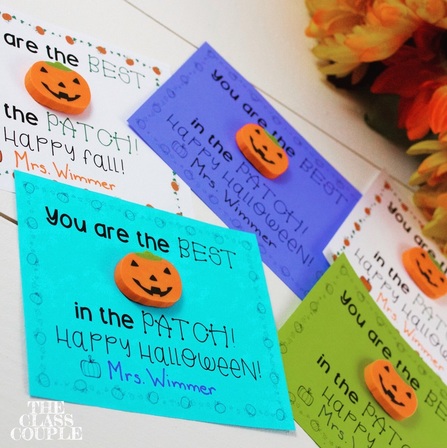
If you happen to pick up these festive items on one of your many trips to Target, be sure to grab my Halloween Gift Tag Freebie to go along with them! If you teach in a district/school where you do not celebrate Halloween, I did include a "Happy Fall" option to go along with the pumpkin erasers. Your kiddos will love how fun they are, you will love that they can be used in the classroom, and your parents will thank you for not sending home another piece of sugar. (They will get plenty on Halloween night!) 

Enjoy, and Happy Halloween!
Picture
Follow
0 Comments

How to Make a Delightful Fabric Garland Banner

7/24/2016

5 Comments

 
 The reading area is by far my most favorite spot in my classroom. When I wanted to dress it up and make it even more inviting, I decided that a fabric garland would give it the perfect touch! I soon became addicted to making these banners, and noticed that everyone I shared them with loved them too. So, after receiving many questions about how I made them, I decided to make a tutorial and share the love of garland banners with everyone. Oh, and by the way, fabric garlands aren't just for the classroom, so read on! 
Learn how to make delightful fabric garland banners/curtains for your classroom, home, party, etc. This post provides step by step directions to help you make the perfect banner.
Step 1: Find your Fabric & Materials
The width of your windows will determine how much fabric you will need. The width of my windows was 12 feet, so I knew it would be a large garland. Because of this, I thought 6 different fabrics would be the perfect amount to add variation in the curtain. I also did not get the same amount for each fabric, due to what they had left of the fabrics. I got 2 yards for 4 of the patterns, and 1.5 yards for 2 of the patterns. This was JUST enough with no fabric strips left to spare, so I would say a good rule of thumb would be to get one yard of fabric per foot. My fabrics were from JoAnn Fabrics. (Don't forget that teachers get a discount!) You will also need to find some heavy twine/jute. You can take a look at what I used. The best deal I found for the jute was at A.C. Moore with a 50% off coupon.
Picture
Picture
Step 2: Prep Your Fabric
Cut off the white edge of the fabric. Then, cut small slits in your fabric. They can be spaced apart in whatever width you would like your strips to be. Mine ranged from 1 to 2 inches apart. 
*Note: Because my windows are tall, I did not need to cut my fabric to make it shorter. However, if you have shorter windows, you may need to cut your fabric to a smaller width before cutting the small slits.
Picture
Picture
Step 3: Tear Away!
Grab ahold of the strip you cut, and pull it down the width of the fabric. The strips won't be exactly the same width, and they will fray, but that's the beauty of the fabric garland: perfectly imperfect! 
Warning: This step will result in high amounts of fringes! Just make a pile and see how big it can get! 
Picture
Picture
Don't forget to admire the prettiness of all the colors!
Step 4: Measure Jute
Now you will have to decide how you want your curtain/garland to hang. I wanted mine to sway down and come up in the middle, so I knew I would need to make it a little longer than 12 feet wide. I decided to cut my jute 20 feet long, keeping in mind that I wanted to have plenty of space at the ends for knots to hang the curtain. (Always measure longer than you think you will need, so you don't run out of twine.) Once I had my 20 feet measured, I folded the jute in half and marked the 10 foot point with painter's tape. This was my middle starting point. I started tying knots in the middle and worked my way out to the ends. This helped me keep the curtain even. I also placed tape marks around the 3 feet mark. I stopped close to these points so I had enough room to tie the knots at the end. I also wasn't exactly sure how it would hang until I got to my classroom, so I wanted to allow for some wiggle room with the length of jute.
Picture
Tape the middle for a starting point.
Picture
Tape the ends to allow room for the knots.
Step 5: Tie ALL the Fabric Strips!
This is definitely the most time consuming part, but don't give up now! It will be worth it in the end...trust me! I suggest finding a series to binge watch on Netflix, enjoying a nice drink, and enlisting the help of your supportive significant other or best friend. Since it is easier to show this step, rather than explain it in writing, check out this super short video I made on how to tie the knots. The only thing you need to be sure of is that you do them all the same way. So if you start with your fabric over or underneath the jute, do that with all of them. 
When you are tying the fabric strips, remember that they do not have to be in any particular pattern. I just tried to make sure I had a good mix of dark and light colors throughout the curtain. Since I had gotten more of two of the fabric patterns, I mixed these into the rotation more often than some of the other accent patterns.
Step 6: CELEBRATE!!
Picture
Woohoo! You did it! Stand up and stretch, give yourself a pat on the back, and thank your helper! Take a look at the lovely fabric garland you just created!

Step 7: Hang and Enjoy!
I tied big loop knots at the ends of the garland. I also used ceiling hooks and placed them on each end of the window, and slipped the loops on the hooks. For the middle, I also placed a ceiling hook at that spot, and put a binder clip through the middle point of my curtain. The binder clip then hangs on the hook. Here is a quick video on how I made the end loops.
That's all there is to it! Such a simple project, but it made a world of difference in brightening up my classroom!
Picture
Oh, and don't think that these garlands are just for the classroom! The possibilities are endless! They are perfect for nurseries, kids rooms, holidays, parties, etc. We made a Christmas garland for our kitchen, and also used it in our family pictures for our Christmas cards.  (Could that picture be any cuter?!)
Picture
Picture
If you decide to make one of these adorable fabric garlands for your classroom or home, be sure to tag me on Instagram! I would love to see it it!
Picture
Check out my classroom projects! 
http://www.donorschoose.org/Becky.Wimmer
Follow
5 Comments

Summer Reading Challenge: Escape In To A Good Book

5/15/2016

2 Comments

 
Do you want to keep your students reading over the summer? They will love finding different places to read with this summer reading challenge, and hopefully grow to love books even more!
Picture
This past week, I gave my students the Fountas and Pinnell BAS reading assessment. I was so proud of all their hard work and their progress along the way. There were times when even I had tears of joy as they were reading and retelling a story. 
(If you follow us on Instagram, you may have seen this post about how proud I was of my students. I wanted to shout it from the rooftops!)
Picture
I want my students to see reading as something they can do for enjoyment, at anytime. I want them to automatically grab a book to take along with them, without thinking twice. I want them to get lost in books, anytime, anywhere. Maybe I am romanticizing the idea, but I believe it can happen. So, I created a summer reading challenge focusing on reading in fun places, with friends and loved ones. 
Picture
I also created a similar challenge chart with a prize incentive when students bring their chart back to school in August/September. You can click here to find both options! If you have a social media account for your classroom, it would also be fun to encourage parents to sent pictures of their child completing the challenge. You could post some of the pictures to your classroom account to keep the incentive going strong throughout the summer.
Picture
Let me know how you keep your kiddos reading over the summer, and feel free to share the successes of your summer reading challenge! Happy reading!
Picture
***Beautiful images from Classroom Clicks and fonts by Kimberly Geswein and Graphics From the Pond.
Follow
Check out my classroom projects! 
http://www.donorschoose.org/Becky.Wimmer
2 Comments
<<Previous
    Picture
    Picture

    Mr. & Mrs.

    We are Becky and Greg from York, PA. Becky just started her 13th year of teaching first grade. Greg is a high school social studies teacher. We love teaching and this blog is a peek into our world. 

    Picture
    Picture
    Picture
    Picture
    Picture
    Picture
    Picture
    GoNoodle Inspiration Blog
    Picture

    the library

    June 2019
    March 2019
    August 2018
    February 2018
    September 2017
    August 2017
    January 2017
    October 2016
    July 2016
    May 2016
    April 2016
    February 2016
    January 2016
    November 2015
    October 2015
    September 2015
    August 2015
    July 2015
    June 2015
    May 2015
    April 2015
    March 2015
    February 2015
    January 2015
    December 2014
    November 2014
    October 2014
    September 2014
    August 2014
    July 2014

    Picture

    tag, you're it!

    All
    Adding
    Alphabet
    Apush
    Assessments
    Authentic
    Becky
    Becky & Greg
    Cause & Effect
    Children's Literature
    Classroom
    Classroom Community
    Classroom Management
    Classroom Tour
    Columbus
    Craftivity
    Criticalthinking
    Currently
    Doubles Facts
    Fact Families
    Fire Safety
    Five For Friday
    George Washington
    GoNoodle
    Graphing
    Greater Than And Less Than
    Greg
    Halloween
    Highfrequencywords
    How To
    Instagram
    Journeys
    Makingconnections
    Math
    Movie Making
    Numbers
    Perspective
    Phonics
    Primary Sources
    Project Based Learning
    Pumpkins
    Purpose
    QR Codes
    Raise Responsibility
    Reading
    Scholastic Book Orders
    Spelling
    Summer
    Summer Prep
    Teachers Pay Teachers
    Technology
    Time
    Twitter
    Videos
    Writing

    Picture

    subscribe

    Enter your email address:

    Delivered by FeedBurner


    Blog Design by Alexis Sanchez ©
Powered by Create your own unique website with customizable templates.